Hey everyone! I just wanted to post a quick blog apologizing for the lack of posts over the past week. It's been a crazy week... Getting the decorations up, shopping, picking up extra shifts, and spending more time with my loves. I will be working hard Monday to get some filming and posting done. Hope everyone is having a great holiday season so far!
xoxo,
JSho
Saturday, December 17, 2011
Saturday, December 10, 2011
Urban Decay Naked vs. Naked2, including Swatches!
I loved the first Urban Decay Naked palette so much that when Urban Decay released it's much anticipated sequel, the Naked2, I had to get it right away! I thought it would be a good idea to post a comparison video and swatches to make it easier for people to check out the two palettes. Maybe you already own the first palette and are trying to decide whether or not you want or need the second. Maybe you don't own either palette and are looking for help in selecting which palette would be best for you. Maybe you want to give someone the palette for a gift and need help figuring out which one to purchase (either palette would make a great gift!). Below is the video I made comparing the two palettes, followed by some swatches to help you get a better idea of the colors.


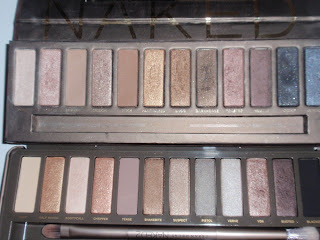


Swatches from the first Naked Palette:

Swatches from the new Naked2 Palette:

*(Original) Naked:
-Beautiful brown velvet case with gold lettering and a magnetic closure
-Price: $48
-Comes with a travel size Eyeshadow Primer Potion from Urban Decay and a single-sided eyeshadow brush (the original release of this palette included a double-sided eyeliner instead of the brush).
-Contains a shimmery black shadow called Creep.
-The shades in this palette seem to be "warmer" shades.
*Naked2:
-Sleek tan metal case with a snap closure
-Price: $50
-Comes with a travel size Lip Junkie Lipgloss in Naked from Urban Decay and a double-ended eyeshadow brush.
-Contains a matte black shadow called Blackout.
-The shades in this palette are of the "cooler" variety.
*Both Naked Palettes:
-Include 12 eyeshadows containing both shimmer and matte shades of neutral colors.
-Both palettes contain different eyeshadows with the exception of Half-Baked (a gorgeous gold color that is featured in both palettes).
-Both palettes are a great value. 12 eyeshadows (plus the brushes/travel size items) for around $50 is a pretty good deal.
-The shadows in both palettes are not only very versatile, but are also well-pigmented, blendable, and long-lasting.
*If I Had to Pick One?
That's really hard to say because I truly love both palettes and personally, I find them both essential to my collection (I told you I was addicted to makeup). However, if I didn't have either and was to receive one as a gift, I would have to go with the original Naked palette (but I'm a little biased as I've had more time to play around with the original).
Hope this review of both palettes helps you out!
Getting NAKED with UD Forever,
JSho
Friday, December 9, 2011
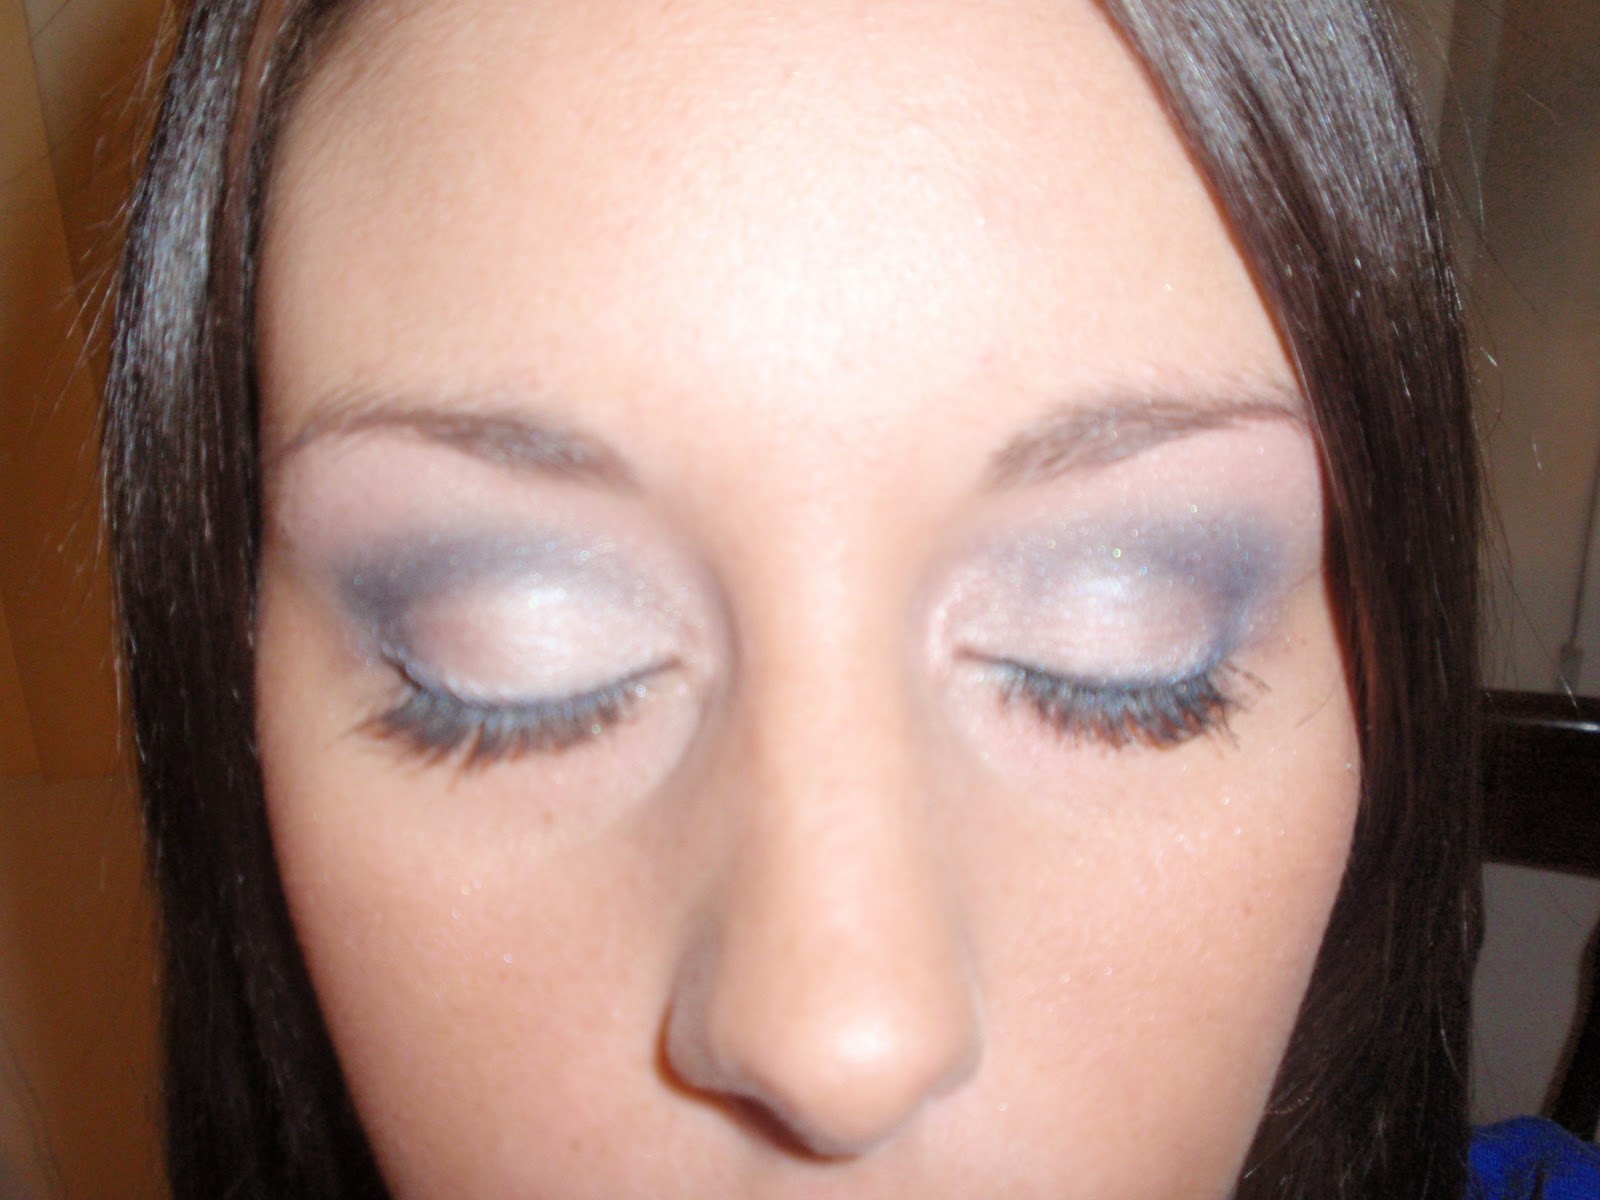
LOTD with Urban Decay Naked2
Hey Beauty Queens!
Here's the Look of the Day featuring shades from Urban Decay's new Naked2 Palette! This is a really neutral, sparkly look.


Here's the Look of the Day featuring shades from Urban Decay's new Naked2 Palette! This is a really neutral, sparkly look.


Products Used:
-Eyes:
-Urban Decay Eyeshadow Primer Potion
-Urban Decay Naked2 Palette eyeshadows: YDK (lid), Busted (crease/outer-v/over eyeliner on lower lashline), Tease (above crease), Bootycall (brow and inner corner of eye highlight), and Blackout (over liner on upper lashline)
-Urban Decay 24/7 Glide-on Eye Pencil in Zero (top/bottom lashlines and waterlines)
-Black mascara and lots of it! ;-)
-Face:
-Tarte Natural Bronzer in Park Ave Princess
-Coastal Scents 10 Color Blush Palette (the plum-berry-mauve color)
-Lips:
-Urban Decay Lip Junkie in Naked
Review & Swatches: Urban Decay NAKED2 Palette
As most of you know, when Urban Decay released it's first Naked Palette about two years ago, it sold out so fast that everybody and their mother was either waiting for it, scouring the stores to find it, or even going on eBay to purchase the product, even if it meant paying more for it than it's retail price. Ahh... the magic of a makeup palette. So when Urban Decay announced the release of it's much-anticipated sequel, NAKED2, I had to order it right away to get my hands on it! I'm glad I did too as the first shipment sold out quickly. Naked2 features twelve shades of eyeshadow and also includes an exclusive double-ended eyeshadow brush along with a travel size Lip Junkie lipgloss in the color (what else?) Naked. Here is my review of the new Urban Decay Naked2 Palette:


Price: $50
Where to Get it: As of right now, this palette is only available at Urban Decay. It should be released to
Sephora sometime in January of 2012.
Pros:
-A mix of neutral colors that are very versatile and pigmented.
-Long-lasting
-Great value for 12 shades of eyeshadow plus the travel size Lip Junkie lipgloss and double ended eyeshadow brush.
-Very buildable and blendable colors
-The case is a sturdy and durable metal case that snaps shut. The case also contains a large mirror.
-This palette contains a matte black shadow
Cons:
-Only five of the shadows in the palette are exclusive to this palette (which isn't a HUGE con for me as I only own two of the featured shades in other palettes I own, so for me this is okay because 10 of the colors are new to my collection of eyeshadow).
-The color Half-Baked was also featured in the original Naked palette (I would have liked to see a new color instead of a repeat of a color already in the original palette).
Would I Repurchase?
-Yes, I would definitely purchase this product if I had it to do over again. I think the palette is amazing and I can't wait to try out many more looks. I'm really interested to create looks using both palettes.
Comment below and tell me, will you be getting NAKED all over again? If you've already purchased this palette, what are your thoughts and opinions about it?


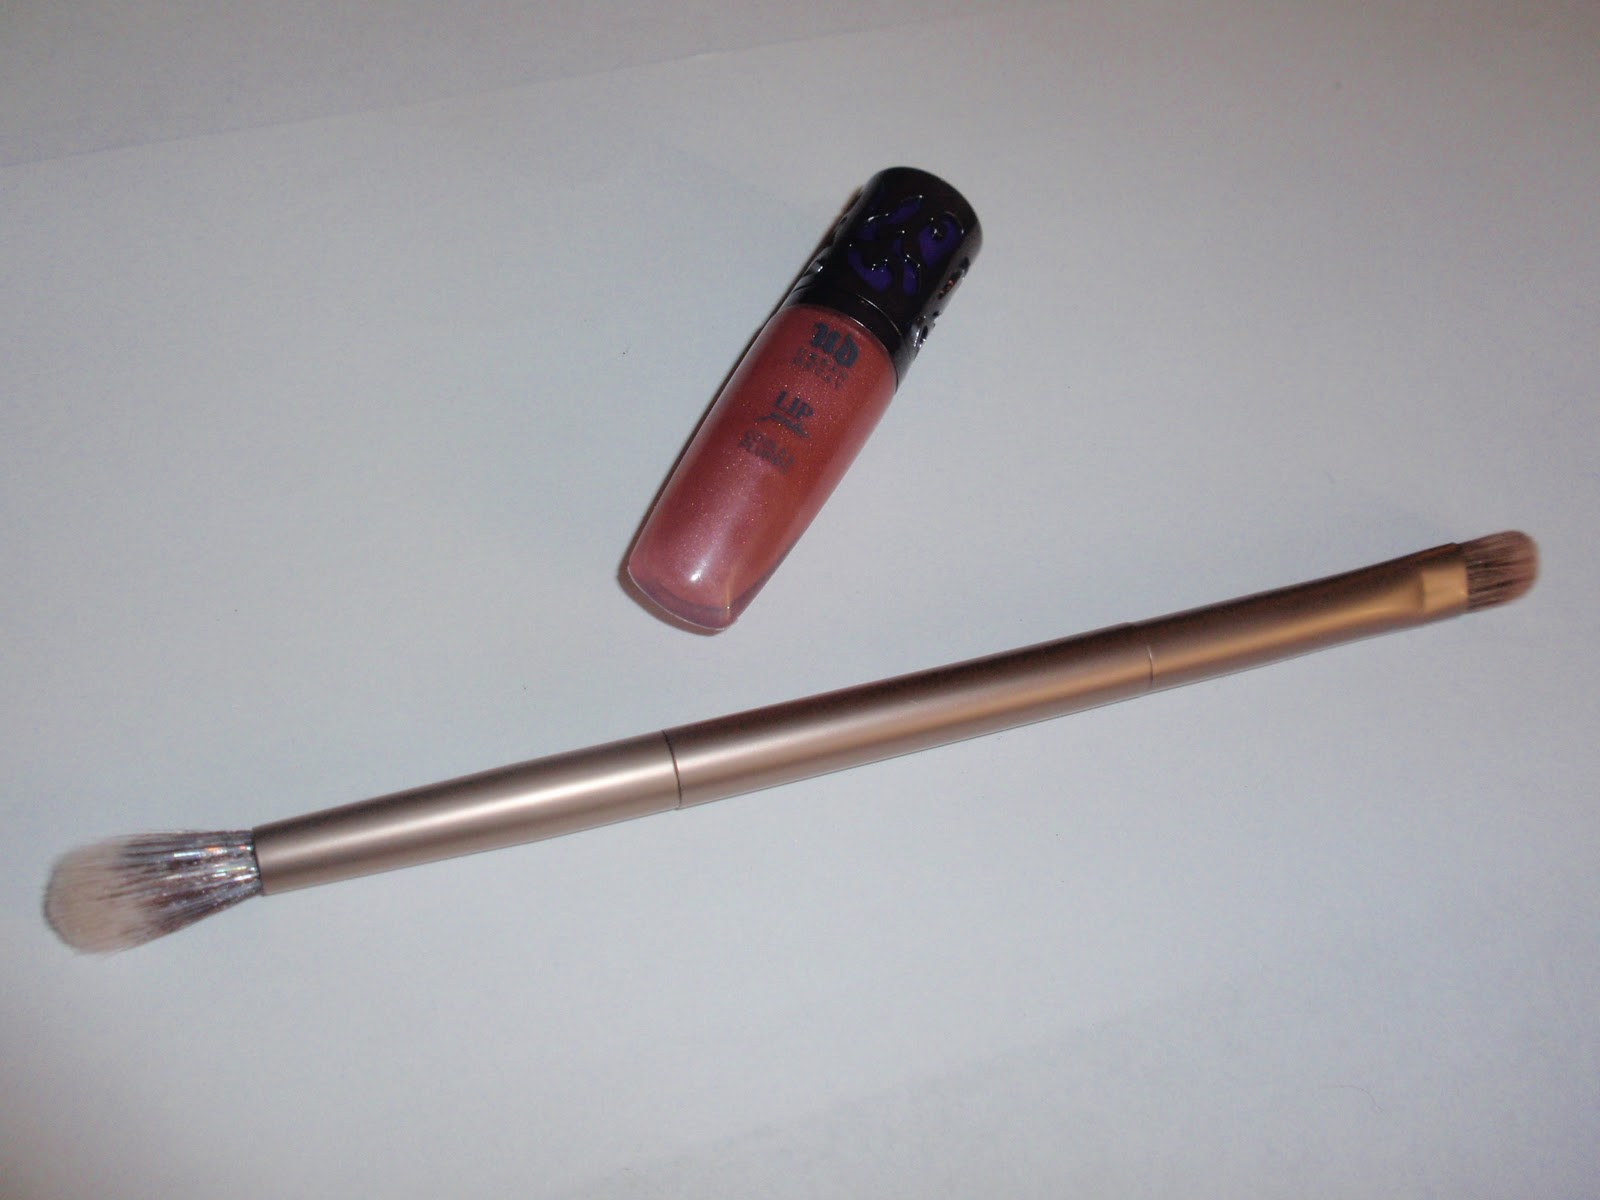

Swatch of Urban Decay Lip Junkie in Naked

Where to Get it: As of right now, this palette is only available at Urban Decay. It should be released to
Sephora sometime in January of 2012.
Pros:
-A mix of neutral colors that are very versatile and pigmented.
-Long-lasting
-Great value for 12 shades of eyeshadow plus the travel size Lip Junkie lipgloss and double ended eyeshadow brush.
-Very buildable and blendable colors
-The case is a sturdy and durable metal case that snaps shut. The case also contains a large mirror.
-This palette contains a matte black shadow
Cons:
-Only five of the shadows in the palette are exclusive to this palette (which isn't a HUGE con for me as I only own two of the featured shades in other palettes I own, so for me this is okay because 10 of the colors are new to my collection of eyeshadow).
-The color Half-Baked was also featured in the original Naked palette (I would have liked to see a new color instead of a repeat of a color already in the original palette).
Would I Repurchase?
-Yes, I would definitely purchase this product if I had it to do over again. I think the palette is amazing and I can't wait to try out many more looks. I'm really interested to create looks using both palettes.
Comment below and tell me, will you be getting NAKED all over again? If you've already purchased this palette, what are your thoughts and opinions about it?
X's and O's,
-JSho
Wednesday, December 7, 2011
Urban Decay 15 Year Anniversary Palette: Review and Swatches
Hi my fellow makeup addicts! I recently purchased the Urban Decay 15 Year Anniversary Palette and I have to say, I LOVE this palette! Below is the video of my review of this product. Happy watching!


Price: $55
Where to Get it: Sephora or Urban Decay
Pros:
-Very unique colors, featuring both neutral and bright colors
-15 Eyeshadows for $55 is a really great deal and the shadows are full-sized!
-Colors are well-pigmented and very blendable. I also feel that the colors can work with all skin tones.
-All 15 of the colors in this palette are BRAND SPANKING NEW!!
-Gorgeous, eye-catching packaging.
Cons:
-A few of the shadows have fallout issues (Midnight Rodeo and Midnight 15)
-While the packaging is beautiful and can be reused as a keepsake box, it's hard to keep the mirrored-
lid clean of fingerprints. I also think the packaging is a little bulky and hard to travel with since the
lid is a completely separate piece.
Overall, I give this product a 4 out of 5. If I had it to do over again, I would definitely still buy this palette!
Disclosure: All product reviews on this site are of my own opinion. I was not compensated or paid to do this review. All products are purchased with my own money.
Monday, December 5, 2011
Favorite Home Beauty Remedies

You're probably looking at the picture above and thinking, how in the world do those products relate to beauty? Well, I'm going to show you. The items shown above are several of the items in my kitchen cupboard (and they're probably lurking in your cabinets too). Not only are they cooking staples, but they're great beauty remedies as well.
1. Olive Oil
I use olive oil in several ways. I use it on my face when it's extremely dry and no moisturizer will cut it. I also use olive oil on my hair, and I sometimes even go as far as to use it on my entire body too.
On my face: I put a thin layer of olive oil on my face and let it sink in for 10-20 minutes. You'd be surprised as how fast your skin absorbs the oil. Then I use my daily cleanser to wash it off. I only really have to do this in the winter. My skin gets so dry and flaky that exfoliating and moisturizing usually aren't enough.
On my hair: I massage the olive oil into my scalp and also apply a generous amount to my ends as well. I put a shower cap over my hair and let the olive oil work it's magic for at least 20 minutes. Sometimes I'll even run my blowdryer over my whole head for added benefits. Then shampoo it all out (make sure you get it all out or it can cause your hair to look greasy) and condition as usual.
On my body: I apply the olive oil in the shower from head to toe and then wash it off with my usual body wash. It adds moisture to my skin.
*If your skin or hair is on the oily side, this might not be the best home remedy for you. I only tend to use the olive oil in the winter when my skin and my hair dry out. If I used it in the summer when my skin gets oily, I imagine I'd have a face full of pimples.
2. Honey
Good ole honey straight out of the jar is great to use as a face mask. I usually apply a thin layer of the honey to a clean face. I even apply it to my lips (softens them and it tastes yummy!). I then let the honey sit on my face for about ten minutes or so before I wash it off. It leaves your face feeling as smooth as a baby's bottom.
3. Sugar
Sugar is a really good alternative to use as a facial or body scrub. Just mix it with a little water (you can even mix it with olive oil if you want the added moisture) and start scrubbing your face or body (or go crazy and do both!) with the mixture. This is a cheap and easy way to exfoliate.
These are just a few home remedies that I've found to be beneficial for me. As with any beauty product, use with caution. Everyone's skin is different and what works for me might not work for you and vice-versa. Please comment below with all your beauty remedies. No matter how quirky they might be, I'd really like to hear them. :)
Peace, Love, and Olive Oil,
JSho
Sunday, December 4, 2011
Easy MAC Pink and Blue Smokey Eye
Hi Ladies (and Gentlemen too!),
Today I thought I'd do my very first ever makeup tutorial. It's a look I wear fairly often and get complimented on every time I wear it. This is a very wearable smokey eye using shades of pale pink and dark blue. Below is the video (really hope you guys like it! As I said, it's my first so I'm still learning!), and underneath I will list the products used along with the steps described in the video. Thanks for watching and I hope you enjoy!


Today I thought I'd do my very first ever makeup tutorial. It's a look I wear fairly often and get complimented on every time I wear it. This is a very wearable smokey eye using shades of pale pink and dark blue. Below is the video (really hope you guys like it! As I said, it's my first so I'm still learning!), and underneath I will list the products used along with the steps described in the video. Thanks for watching and I hope you enjoy!

Products Used:
MAC Paint Pot - Painterly
MAC Eyeshadow - Naked Lunch
MAC Eyeshadow - Contrast
MAC Eyeshadow - Malt
Urban Decay Naked Palette - Sin Eyeshadow (find it at Urban Decay or Sephora)
Benefit Speed Brow (find it at Sephora)
MAC Fluidline - Blacktrack
MAC Eyeliner - I Get No Kick
NARS Bronzer - Laguna (find it at Sephora)
NARS Lipgloss - Turkish Delight (find it at Sephora)
Bobbi Brown Shimmerbrick - Tawny (find it at Bobbi Brown)
Revlon Colorstay Eyeliner - Black (can be found at most drugstores)
*All MAC products can be found at MAC
Steps (shown in video):
1. Apply MAC Painterly paint pot to entire lid, from lash line to brow.
2. Pat MAC Naked Lunch e/s onto lid.
3. Apply MAC Contrast to the crease and also to the outer-v.
4. Line the upper lash line with MAC Fluidline in Blacktrack. Go over this liner with MAC e/s Contrast.
5. Blend all harsh lines.
6. Apply MAC Malt e/s as a transition color where the crease color ends and also use it to blend the harsh lines from the crease.
7. Apply Urban Decay Sin as a highlight color on the inner corners of eyes and also under brow bones.
8. Comb Benefit Speed Brow through brows.
9. Line lower lash lines with Revlon eyeliner and then dip the eyeliner into the MAC fluidline, then apply this to your top and bottom waterlines.
10. Go over this liner with the MAC e/s Contrast, just as you did with the top lashline.
11. Take MAC's I Get No Kick Liner (or a shimmery pink liner/shadow) and apply it on the bottom lashline on the inner and outer corner only.
12. Apply your mascara!
13. Apply NARS Turkish Delight Lipgloss to your lips.
14. Make a fish face and apply your NARS bronzer, then smile and apply the Bobbi Brown Shimmerbrick to the tops of your cheekbones and up to your temples.
And for the last step.... SMILE! You look gorgeous! :)
*Introduction*
Hi Everyone!
My name is Jennifer and this is my beauty/makeup blog. I am 24 years old and from Ohio. I'm a waitress and also a psychology student. I'm starting this blog because for as long as I can remember, I have been addicted to makeup and all things beauty-related. I really enjoy reading about new trends and tips and creating new looks. This has been a passion of mine for a long time so I figured, why not start a blog?!
I'm hoping that not only will I have fun, but that hopefully someone out there will learn something from my site. I've given this a lot of thought, and while I have some hesitation (it's a little nerve-racking to put something out there and not know how it is going to be received), I'm ready to see where this takes me. This is the first time I've ever done anything like this, so wish me luck! :)
I'm looking forward to writing articles and tips and posting makeup tutorials and reviews. As I said before, this is my first time, so please be patient and bear with me as I learn the ins and outs of blogging and making videos, and all that fun stuff that's involved with the whole process. Please feel free to leave me feedback on what types of things you'd like to see me post or ideas for looks you'd like to see me take on.
Hope everyone has a wonderful day and I look forward to the adventure that is about to begin!
xoxo,
--JSho
Subscribe to:
Posts (Atom)